Friday, January 29, 2010

A Card for Friday

Happy Friday! I am still in the process of relocating my craft room but I have most everything down in the new spot. I am certain that I will be re-arranging everything before it is set. I am loving the nice natural light in my new spot but it is taking a little bit of time to get used to the move.
Today's card is inspired by Tim Holtz. I love all of the ideas on his blog, it is a great place to get inspired.


I started with my quarter sheet of card stock. I laid the Tim Holtz Flourish mask over the cardstock. You can see it in the photo if you look carefully. I am working on my Craft Sheet from Ranger. A must have in your craft arsenal if you ask me. It keeps me from making a huge mess of my craft area.
I spritzed the card with my custom Distress Ink mister, I made it with Vintage Photo Distress Ink and Perfect Pearls in Perfect Bronze. You combine that with water in a Mini-Mister. Once I had my color on I lightly blotted at the card with a paper towel to pull the excess off of the mask and to keep the color from puddling on the cardstock.


For the next step, I spritzed opposite corners with Patina Glimmer Mist from Tattered Angels. You can see that I let it set on the cardstock a little too long and it pulled a little color under the mask.


I dried my card with my heat gun before going to the Direct-to-Paper techniques. I used Peeled Paint and Broken China Distress Inks applied to the masked area.

My next step was to add a little Vintage Photo Distress Ink to accent the flourish.

I then added a little Walnut Stain and Black Soot Distress Inks to the edges of the card. I then stamped the Hero Arts Antique Flower Background stamp in Archival Black. I somehow forgot to get a photo of this but you can see it in the final photos.


I grabbed a piece of white scrap cardstock and stamped the Hero Arts Elegant Brocade in Peeled Paint Distress Ink and then embossed with Clear Embossing Powder.

Next, I stamped over the brocade with La Letter in Black Soot Distress Ink, this stamp is also from Hero Arts.

I cut the images out using Spellbinders Labels Two and then worked Old Paper Distress Ink onto the whole label. It might have been easier to cut out the label first but hey that's how I roll. :-)

I then added Vintage Photo Distress Ink around the edges.
I mounted my label to a large label cut from Chocolate Chip cardstock by Stampin' Up. I had distressed the edges of the brown cardstock. I added vintage bronze eyelets from Making Memories.
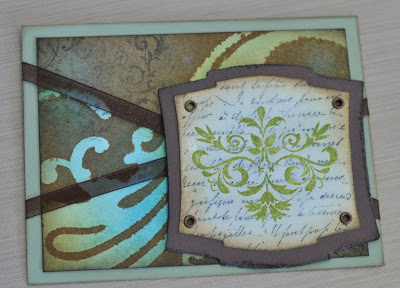
I added the brown organza ribbon from Creative Impressions and mounted the background to a piece of Certainly Celery cardstock from Stampin' Up. I added some Vintage Photo Distress Ink around the edges I used a light application so it is a little subtle.
I have a large jar of paper flowers from Prima that I sorted through for the right colors of flowers. As you can see I have a very sophisticated technique for finding the correct flowers. I glued these to the front of my card and added pearls from Kaiser Scrapbooking.
Here is the finished card! Have a wonderful weekend and thank you for visiting!


Tuesday, January 19, 2010

Anniversary Card

Hello - out there is Blogger land! I am almost feeling like myself. Just a little cough left but that is pretty much it. I normally do not get sick so having such a bad infection/cold (I suspect that I actually had more then one right after the other) was really hard for me. One of the interesting side-effects of being pregnant, I guess.

On to today's card. My husband and I have an Anniversary tomorrow. This actually isn't our wedding anniversary which is in February, but the anniversary of our first meeting, 14 years ago. We have pretty much been a couple since we met in college so we acknowledge this anniversary. (Really and truly we don't do anything or buy presents but just say Happy Anniversary). I don't normally even make a card but this one was knocking around in my head, since I saw a version of this on Linda aka Oz's blog Wood INK.

I start out with my quarter sheet of cardstock. In this case I am using Neenah Classic Crest Cover in Solar White (80 lbs). This is actually what I have been using for awhile and I have been very happy with it. I can pick it up locally at a paper store and it works out to be about .10 per sheet.


Next, I created two masks using plain printer paper. I used my Fiskars Shape Cutter and the Heart Template also from Fiskars. I was careful not to tear the paper so I would have both a positive and negative heart. I am using the positive image first. I have placed the heart cut out in the center of my cardstock and stamped the French Script background image from Stampin' Up in Frayed Burlap Distress Ink from Ranger.


Once I remove the mask you can see I have a heart shaped void in the center of my card.


Then I used the negative of my mask, so the area around the heart would be protected. I lined up my new mask with my previously created void and stamped Antique Flower Background from Hero Arts in Weathered Wood Distress Ink from Ranger.


Once I stamped the image I wanted to add a little dimension to the heart. I took my Inkssentials Blending Tool with the Weathered Wood Distress Ink and worked that over my heart, keeping the darkest area to the outer edge of the heart. My intention with this is to give the heart more dimension. Once I had the grey as I wanted it I went back over the edges with a very light application of Black Soot Distress Ink.

When using printer paper you have to be very careful not to tear the mask, you can easily do this is you use a bit too much gusto when inking. I use my left had to hold the section where I am working down, so as not to catch the edge of the paper and tear it.


You can see how the Distress Inks give added dimension to the heart. I think that it really pops.


Now I needed to add some color to the script portion of the card. Again I picked up my Inkssentials Blending Tool. I worked in Antique Linen and went all over the script. I did put my mask back over the heart to protect it while I worked close to it. If you like to live dangerously you could probably just risk it, I know that I cannot be trusted. :-)


At this stage I worked with Vintage Photo Distress Ink keeping it to the outer edges, then to Frayed Burlap on the very edge of the card. I really like the contrast between the cool grey heart and the warm paper.


I mounted my card to a piece of Basic Black cardstock and added four brads in a vintage metallic from Making Memories.

My very last step was to add the two birds. I broke out my Silhouette Digital Cutter and cut them in a grey cardstock. These birds are from a dingbat font called Birds of a Feather. Once they were cut out I inked them with Weathered Wood and Black Soot Distress Inks. I mounted them to the card with foam dots. I left this step to the end so I could use my ATG without having to go over bumps. I normally forget that and smoosh the front of my card while trying to lay down adhesive or I end up putting the adhesive on the card base.

Here is the finished card. Thank you, as always for stopping by.

Friday, January 15, 2010

Mahalo - Thank You Card

About two years ago my husband and I took a trip to Maui for a friend's wedding. We had never been to Hawaii before and we loved every minute we spent on the island. This card takes me right back to that special time.


This card was inspired by Bunnie800 over on the Quickutz Community Gallery she made a very similar card using a flower punch. To start I cut my flowers out of white cardstock. There are actually two sizes of flowers. They were then inked with Worn Lipstick Distress Ink. To create the curl to the petals I used a cuticle stick and/or a small dowel to wrap the petals around. (I used the cuticle stick for the small flowers and the dowel for the larger) Once I did that I sprayed them all with Tattered Angels in Pearl and added the pink gems from Hero Arts. Now you can't really tell in the photos but the background paper has a shimmer to it, it is from Brazzil. For my final step I cut out the sentiment using my Silhouette and a font called QK Marisa.


On the flowers, I had a really hard time getting the pink to look like I wanted and I ended up with a strange technique. I tried using a sponge, which made the ink blotchy. Next, I tried my ink blending tool from Inkssentials but that was giving me way too much color and a clear line in the ink. So, what I ended up doing was pouncing my pinkie on the ink pad and picking up ink and then dabbing that in the very center of the flower, then while the ink was still wet I used my ink blending tool to smooth the color outward towards the tips of the petals. Here is a close-up of the soft color. After that just a light spritz of glitter and we were ready to go.

All in all, this is a very simple card. It took me forever to really work out what I wanted and this time I managed to edit myself and go with less. I am thinking that I may have to make this card with yellow flowers. Have a wonderful weekend and thank you for stopping by!

Thursday, January 14, 2010

Cards for January 14th

Hello - I hope that everyone had nice New Year's Eve. I haven't been able to post much because I have been fighting a wicked sickness/cold/infection. Since I am pregnant, there aren't a ton of medications that I can take. I am still sick but I have to believe I am on the mend. Anyway, I have a few cards for you today to make up for my absence.

I love the Medallion stamp from Stampin' Up, it is pretty new to me so I haven't used it a ton. I saw a really inspiring card over on Splitcoast Stampers using lime green on black and this is what I came up with for my version.


I started with a black card stock base, just a little something I had lying around. I stamped the Medallion using Versamark and embossed with American Craft's Zing! Embossing Powder in Frost. Next I colored in some of the openings in the image with a white Gelly Roll gel pen. I also added a few silver touches using a silver paint pen.


I then added the Nailhead stickers from Mark Richards. They are red and are in essence the same thing as gems. I was digging around in my box of brads and found the center gem brad, it was just perfect. I am not sure where it came from. Next I added the two ribbons the blue ribbon is a fuzzy velour that came from the dollar bin at Target. I bought it last year right before Valentine's Day. On top of that I adhered a piece of red grosgrain ribbon from Stampin' Up. The two ribbons together were pretty thick and so I used Tombow Aqua Glue and then set a weight on the card while it dried to adhere them to my card. I added the three square brads from Memory Makers for an additional accent. For my last steps I adhered my main element to a piece of Real Red card stock from Stampin' Up and then all of that to a piece of Taken with Teal.


I love Tim Holtz and this card is a direct inspiration from his 2008 Christmas Tags. The paper flowers are an idea that I found on Jennifer McGuire's blog but they originally came from Dawn McVey. There is a great tutorial video here http://dawnmcvey.typepad.com/these_are_a_few_of_my_fav/2010/01/new-raspberry-suite-sneakie-peek.html. I didn't have a vintage book to use for the flowers so I made my own vintage pages.


I started with a piece of vanilla card stock and I painted the whole piece with Adirondack paint in Pitch Black. I let that dry and then stamped the flourish images from Stampers Anonymous and then the French Script from Stampin' Up. All images were embossed with clear embossing powder and the heated. Once that cooled I dabbed on Adirondack paint in Pool and then scrapped it around with a make-up sponge. I let the paint mostly dry and then rubbed off the extra paint with a slightly damp paper towel. This takes the paint right off of the embossed images. Once everything was dry I added a little Distress Ink in Black Soot around the edges. Here is an image with the background by itself.

This image is a little yellow, I am still getting used to the natural light in my new craft area. I mounted this to a teal piece of card stock and then black card stock.

My next element was the swirl, this is a piece of Grungeboard from Ideology. I painted it with Pewter Crackle Paint by Ranger. I put it on pretty thick and as such it look forever to dry. Once it was completely dry I sponged over the element with Distress Ink in Black Soot. I adhered that to my card.

Now on to the flowers, if you have watched the tutorial video you pretty much know how to make these but I am going to walk you through how I did it without the vintage book pages. To begin I cut out eight flowers using my Silhouette Cutter, instead of card stock I used printer paper. Here is a single plain flower.


Next, I stamped La Lettre from Hero Arts in Black Soot Distress Ink. It was at this point that I have both French and English on my card but it works for me. I took French in High School and sometimes I try to pretend that I can still speak French. So I am really speaking some strange hybrid language I call Franglais.


Next, I aged each layer with Distress Ink. For the lighter flower I used Tea Dye and then Vintage Photo on the edges. For the darker flower I used Vintage Photo and then Frayed Burlap on the edges. There is a big difference in aging printer paper versus card stock , you have to be much more careful or you can easily tear the paper.


The next step is to take four layers and place them on top of each other and add an eyelet.


The final step is to squish up the top three layers.

I then added the large element in the center. It is a brad from Making Memories but I snipped off the fasteners and then just glued it on to the center. The fasteners were too big to fit through the eyelet. I really wanted to use a nice button but I don't have any buttons in my craft stash.
Well I guess that isn't exactly true I did have bright pink and lime green but I didn't think that they would have worked with this card. :-)

To finish my card I added a sheer black ribbon from Stampin' Up and three small adhesive pearls. I really worked on this card and made countless changes to it, I think that it paid off in the end.
I have one more card for you but I think I'll save it for tomorrow. Thank you for stopping by and have a great day!