Thursday, December 24, 2009

Our Holiday Card


I have been very under the weather this week, since I am pregnant I can't take all the medication that I would normally. I am feeling a bit better today but still not great. So, per usual our holiday cards have gone out a little late. We ended up with two colors because I didn't have enough of the raspberry cardstock.


I started by stamping the deer image in Rich Razzleberry. The deer is from the Basic Grey set Figgy Pudding. My next step was to shadow stamp the image with Going Gray. Of course I forgot to take a photo of that step. It was an overcast day while I was working and I just couldn't get the light bright enough, so sorry about the poor quality.


Next I stamped the background with the Rich Razzelberry. This image is from the same Figgy Pudding set.


I know that it is a little hard to see but this is where I stamped the Going Gray as a shadow.


My next step was to color my crystal elements with Adirondack Alcohol Ink in Currant. This is a great technique.


Here you can see the clear crystals and the Currant colored images. I didn't have any navy colored ink so those stayed clear.

Once I assembled my card I added the clear crystals on the background and the colored crystals on the deer image. While you cannot see it in the photos, I spritzed all the cards with Tattered Angels Glimmer Mist in Pearl.


Here is the Razzleberry card assembled with Silver Cardstock.


Here is the Night of Navy version.


Here they are together. Fairly simply but when you make a lot you have to keep them pretty easy. I forced my husband to help me with assembly process. He loved my ATG 714 which validates my purchase of it. :-)


Friday, December 04, 2009

I finally had a moment to make and post a card!!

I know that I have been slacking off on this blog. In all fairness I have been busy and we got a new puppy and she doesn't give me many free moments.


Here she is "helping" while I made this card. Actually this was the reason that I was able to get anything done today. She has crazy times where you cannot ignore her.


Here is the card for today. I actually dreamt of this card. I love my damask stamps and I think that the shading turned pretty nice.


I was feeling very Fall-ish although it is very cold and Wintery here in Colorado.


I started with a white sheet of cardstock, I use Neenah Classic in Solar White. I cut this sheet to 4x5 1/2 inches.


My next step was to sponge my cardstock with Crushed Curry by Stampin' Up.


I waited for my first layer of ink to dry, it wasn't quiet as dry as I would have liked by I can be a little impatient. I stamped the damask image using Chocolate Chip Craft (Pigment) ink from Stampin' Up and embossed with Chestnut Zing! embossing powder from American Crafts. The stamp is from Technique Tuesday from the Small Damask set.


I then sponged around the edges and over the damask images with Dried Marigold Distress Inks by Ranger.


I then added Spiced Marmalade Distress Ink by Ranger. I went around the edges and over the damask making sure that I left the previous colors.


I came back over the center of the images and lightly over the edges with Chocolate Chip Classic Ink (Dye) by Stampin' Up. I also added Fired Brick Distress Ink by Ranger over the brown. I think that this gave the colors more depth and kept the brown from standing out too much.

I went back over my card with Crushed Curry to blend in all of the colors. I then mounted the background to a quarter sheet of Chocolate Chip cardstock.


To finish off my card I added brown organza ribbon from Creative Impressions. I cut the accent piece using Spellbinders Label 4. I replicated the inking process and added the custom colored brad.

Wednesday, November 18, 2009

Why the Silhouette Rocks!

I have used my Silhouette Craft Cutter for a few projects that I have posted here but I did something with my machine that I had to share. This machine rules. I can cut any font that I have on my computer and really any shape that I load to it. I love it. Last week The Greeting Farm offered a set of digital stamps inspired by Twilight. They were so cute that I bought them all.


Smooth and even cutting has never been a strength of mine. So I printed out a few of the images and colored them with my Copic markers. They were great until I cut them out. So, I thought that maybe I'd try and load them to my software and see what I could do. So loaded them to the software clicked on Get Outline and choose Select Outer Frame Only and voila - I have now told my machine to cut out the outline. So I can print the image through the software then load that paper to my cutter and voila it cuts out the shape I just printed.


I love layering, I feel that it just gives the imaged more depth and weight. Once I printed the images I went back to my software and selected Offset Shapes. I can choose how much offset (or shadow) I want and just like that I have a layering piece. I was so impressed, I had to share it. :-) Here are the photos of what I am talking about. I am using the Ebony image from The Greeting Farm.

Here she is printed and cut out with the Silhouette.


Here is a close up so you can see how well the machine cut everything out. I know that it isn't perfect but since this was my first time with this process it may be me. Plus my bossy printer keeps asking me to calibrate it. It is still way better than what I could do.


Here is the shadow I cut out.


Here she is with her shadow. I love that you can make it whatever size you want. For this one I went pretty small. This is a great feature for text too.

Here she is with her shadow under her.


I know that this isn't Ebony but I haven't colored her yet. So here is a completed Jeremy. He was colored with Copic Markers. I know that I have said this before but every time I use them I feel like I need more. This time was no different. I have about 20 markers in my online shopping cart, just waiting.


Here is the Ebony that I colored before I found this awesome trick. :-( Now I have to cut her out as neatly as I can, or bribe my Engineer Hubby. Hmmmmm!

Until next time!


Friday, October 30, 2009

A little Halloween Card

Well, I am finally back. I have been so busy with my photography and then travelling to family weddings. It was great to sit down and make this little card.


I started with a quarter sheet of Basic Black cardstock I stamped the flourish image from the Majestic set by American Crafts with Versamark ink and embossed with clear embossing powder. Since it is hard to see the images I stamped one at a time and then poured on the embossing powder but I didn't heat them until they were all done. Since the powder is white until you heat it you can see where the previous images were. I edged it with the EK Success punch and mounted it to Brushed Silver cardstock.
I then cut out the three label shapes using the Spellbinders Label Four set. I stamped the bat from Inkadinkado with Memento Ink in Tuxedo Black. I then embossed with Iridescent Ice embossing powder. I added a silver bellyband and black grosgrain ribbon. I threw the in some black brads and voila we're all done. I have a large collection of metallic brad so I just use embossing powder to color them to match my cards.
I pretty simple but fun card. Of course everything in my house is covered in glitter. Have a Happy Halloween!!


Friday, September 18, 2009

Friday - Elegant

I don't normally post two in one day but I just couldn't put the Devil Duck card in the same post with Damask. So, you get two.


I began this card with Pink Passion cardstock from Stampin' Up. I stamped the Damask images with Archival Ink in Black and then embossed with Black Embossing Powder. All of the stamps in this card are from the Damask Designs set from Papertrey Ink. Once I had all of the Damask images stamped and heat set I went over the card with Pixie Pink Ink and then Pink Passion Ink and finally Rose Red Ink using my quarter sponge. With the Pixie Pink and Pink Passion I went around the edges but also over the prints as well. I think that this gives additional depth to the card. With the Rose Red I just stayed on the very edges. My next step was to layer my pink cardstock onto a quarter sheet of Basic Black. I added a bellyband, also in Basic Black, then added the organza ribbons. Both ribbons are from Stampin' Up in Pink Passion and Black. I punched the oval using my Stampin' Up Large Oval punch and edged it with a little pink ink and stamped the sentiment. I added the oval to the card first and then added the pink metallic brads from Memory Makers. I finished off the card with four black eyelets set in the corners, they are from Stampin' Up.


This card was created using Archivers Cardstock in Sand and Burgundy and accented with Brushed Gold cardstock from Stampin' Up. The stamp set is Baroque Motifs from Stampin' Up. I stamped the background swirls with Black Archival ink and then embossed with Stampin' Up Embossing Powder in Burgundy. I then stamped a shadow image using Versamark Dazzle in Champagne. I stamped the main image with Versamark and embossed with Gold Embossing Powder from Zing! I also shadow stamped this image with Versamark Dazzle. The center brad started life as a gold brad but I embossed it with the same Burgundy Embossing Powder as I used earlier in the card.

I really liked the way this card turned out, I hope the recipient thinks so too.

I started with Real Red cardstock from Stampin' Up. I stamped the flourishes, which are from the Kimberly Poloson set called Flourish, in True Black ink from Memento. I then embossed with Black Embossing Powder. I shadow stamped flourishes again using Versamark Dazzle in Champagne. I edged my cardstock with the Corner Chip punch from EK Success. I then edged the cardstock with Worn Lipstick, Fired Brick and Black Soot Distress Inks from Ranger. My next step was to stamp the small flourishes on white cardstock with Memento Ink in True Black and emboss with Black Embossing Powder. I then punched these out using a circle punch from Stampin' Up. I also cut out Basic Black mounts for my circles using the next size up of circle punch. I aged the white circles using Old Paper, Tea Dye and Walnut Stain Distress Inks from Ranger. The Walnut Stain was only applied to the edge of the circles. I added the Black Organza ribbon from Stampin' Up, mounted my circles and then added the Red Gems from Hero Arts.

That is it for today - have a wonderful week!!

Friday - Whimsy

We have family that live in the Greater Seattle area and a few years ago my husband and I made a trip up to visit them. There is the most wonderful store called Archie McPhee. They have the strangest and most kitchy products you could ever want. One of my favorite items is the Devil Duck. (My husband thinks that the Zombie Duck is better but he is way wrong.) It is a rubber duck with edge. I made the below card in homage to said Devil Duck.


While most of my card feature some stamping, this one was made completely with my Silhouette Cutter and one EK Success punch. I started with the basic rubber duck from QuicKutz and I free handed the beak, horns and eyebrow in the RoboMaster program. I then cut out the wave shapes and added the white shadow. The skull and cross bone punch is from EK Success.


Sorry this is blurry, I really should make sure that I have gotten a good photo before I give the card away. The main stamped image is Dahlia from The Greeting Farm. I colored her with Copic markers. Most of the cardstock is random pieces from my stash. On the bright teal circle I stamped with a Fancy Pants image in Versamark. The sentiments were cut out using my QK Revolution. The "U" is from the Blossom alphabet set and "rock" is from the Zoe alphabet. The DP is from Fancy Pants. I cut the circles with my Fiskars Circle Cutter.


I was again using my Silhouette Cutter for this card, in fact all images are from QuicKutz. I first cut out the ladybug using Basic Black and Real Red. I shaded the red using Worn Lipstick, Fired Brick and Black Soot Distress Inks from Ranger. The highlights were added using a Sankura White Gel pen. Next I cut the ovals in Real Red and White cardstock. The sentiment was also cut out using my little favorite machine. I added two black brads for accents. My last step was the grass, once I cut that out I added the color using Shabby Shutters and Peeled Paint Distress Ink from Ranger. When I add small die cuts to my cards, things like letters, I use Two-Way glue.

Wednesday, September 02, 2009

I'm back . . . . well at least for now

As I mentioned in my previous post, things have been crazy busy around here. We have one more "normal" horse show to photograph and then the huge Championship competition here in Colorado this month. After that I am planning to spend lots of time crafting!!! Of course, that is after the editing, stressing, completing orders and stressing. Here are a few cards that I have put together over the last few weeks.


So clearly this isn't the greatest photo. :-) I totally forgot to get a good photo of this card before I was about to give this to my dad for his birthday. So this was all I could do. My inspiration for this card is the cover of OneRepublic's album. I first stamped the tree from Inkadinkado's Fall Season Set with Versamark ink and then I embossed with white embossing powder. I then applied the following Distress Inks with 1/4 sponge; Broken China, Dusty Concord and then Black Soot. I edged the main image with a silver paint pen, layer onto Basic Black CS from Stampin' Up and the added the brads.


The sentiment is from Papertrey Ink's Damask Designs, stamped on black CS with Versamark ink and embossed in silver powder from Stampin' Up. I then edged with the silver paint pen. I'll admit when first heard about Emboss Buddies I was skeptical. I thought "Just one more thing to buy that won't help." Well, I finally caved and bought one and I loved it, especially on dark papers or when you will be layering color over your embossed image. They certainly have a life span, my first one was leaving white powder all over my cardstock and was not rubbing off but once I replaced it, back to happy times. I highly recommend this tool to anyone that does a lot of embossing.


I have a thing for most things British. The Rampant Lion is certainly one of my favorite images. I have a T-shirt that is green with a Rampant Lion with a crown that inspired this card.

To start I took the following Distress Inks and rubbed them on my craft sheet; Tea Dye, Shabby Shutters and Pealed Paint. I then spritzed with my Mini Mister. I rubbed the cardstock onto the ink puddles about three or four times to get the look I was after. Between rubbings I dried with my heat gun.

The Rampant Lion image is from the Tim Holtz's Collection from Stampers Anonymous and comes from the Regal Flourishes set. The crown is by Hot Off The Press and is from the Flights of Fancy set. I stamped the image with Broken China Distress ink and then dusted with Perfect Pears in Gold. The blue paper was some random cardstock that I had in my craft and while it looks black in the photo the other cardstock is a Gun Metal from Brazzil. The ribbon is black organza ribbon from Creative Impressions. The Fleur-De-Lys is an EK Success punch that I embossed with Sahara Pearls embossing powder from Stampendous. I embossed the punch three times to give it the dimension. There is a small green gem in the center of the Fleur-De-Lys from Hero Arts.


This was another simple card but I think that it has a really elegant look to it. The navy cardstock is Night of Navy from Stampin' Up. The pink DP I used on the background is from the Old World Stack by DCWV. I cut out a circle with my Friskar's Circle Cutter in Night of Navy and a smaller one from white cardstock. I sponged onto my white circle with Tattered Rose and Worn Lipstick to mimic the background paper. I then stamped the image from Stampin' Up's Finest Flourishes in Faded Jeans. I also embossed this with clear embossing powder. I added very small dots of Distress Stickles in Faded Jean on the two small dots on either side of the flourish. The Bonjour is from the Stampin' Up set Carte Postal and was also stamped with the Faded Jeans Distress Ink. I edged all of the cardstock with a very small line of silver using a silver paint pen. I just applied the paint to the edges. My final element prior to assembly was setting the eyelets, and I actually used a ruler this time, so they are pretty straight.

That is it for today! Thank you, as always for stopping by.

Tuesday, August 25, 2009

Back Soon

I have been completely ignoring my blog. For those of you that don't know, I am a Dressage photographer and we are right in our busy season. As soon as I complete my editing I'll be posting some new cards. I hope you are all enjoying your summer!

Friday, August 07, 2009

Red & Black

Sometimes I have cards rattling around my head for awhile, I have been having a black and red construction bouning around in my head for sometime. The card creation process is usually fun and I really enjoy it, usually. Pulling this card from deep within my brain was a bit painful and I struggled getting everything to come together - but here it is.


So I started with a red piece of cardstock, I stamped the image lower left-hand image from Bo Bunny in Versamark and then embossed with clear embossing powder. I then shadow stamped the same image with Worn Lipstick and then embossed again. I then grabbed my trusty sponges and layered on the Worn Lipstick, then Fired Brick and then I layered on the Black Soot.


My next step was to stamp the large wroth iron image over the red stamp and inks. The large image is from Fancy Pants, it is strange because it matches the Bo Bunny image but is a size up. Next I stamped the silver image in the top right-hand corner with Versamark and then embossed with Zing! embossing powder in Platinum.


I cut out the red circle with my Revolution and Spellbinder die. I stamped the circle with the background stamp from Stampin' Up called French Script. I used Fired Brick Distress Ink and I did the same with the bellyband. I then rubbed the edge with Fired Brick and Black Soot Inks. The "M" was cut using the QK Revolution and it from the Magnolia alphabet set. I pressed it into a Versamark pad and then embossed with the Zing! Platinum. I added the red ribbon from Stampin' Up and then layered onto a charcoal accent papers.


As you can see, this card is very similar to the first one. Instead of embossing the top right hand image with Platinum I used Black Glitter also by Zing! Embossing Powder. Next, I took a button from Little Yellow Bicycle. It started out white and I covered it with Versamark and embossed it with the same Black Glitter Embossing Powder. I added the side accent and place a few gems from Hero Arts.
As I always say - skulls are not just for Halloween!! Thanks for stopping by.


Thursday, August 06, 2009

'Ello Govna'

I love all things British, in the spirit of my adoration I have made this British Bulldog card.
Can you tell that I am in a distressing mode?? To begin I started with a blank white card. I sponged on Antique Linen, Tea Dye, and Vintage Photo Distress Inks, then I added a very little touch of Walnut Stain on the very edge. The awesome bulldog is from Inkadinkado. I stamped him with Jet Black Archival Ink, added a few touches of colour with my Stampin' Up markers, cut him out and then aged him in the same manner as the background. I then mounted him on a piece of black cardstock and cut that out.

Now to the Union Jack, I cut the flag out using my Quickutz Silhouette Craft Cutter it was cut from white cardstock. It was in three layers. I sponged on the background piece with Broken China Distress Ink and then worked in Faded Jeans. Next I worked on the top layer, starting with Worn Lipstick and then Fired Brick Distress Ink. I worked Antique Linen on the light part of the flag. I then assembled my flag, and then aged it following the same process I used on the background of the card. My last step was to mount this to my black cardstock. I stamped the sentiment in Walnut and that was it. This was pretty quick and easy and I think that this bulldog rocks. Have a great night all!

Monday, August 03, 2009

Fairy Card

I love The Greeting Farm's stamps. They are super cute and I love breaking out my Copic markers to color them. The only problem is that I feel like I need to buy more markers every time I use them!!!


Here is my latest creation featuring the Flutter Anya stamp.

The pattern paper is from Making Memories, the flowers are Prima and the solid cardstock is all from Stampin' Up. The Flutter sentiment is from Making Memories. I used my Stickles all over my flowers and on the wings.

Here is a list of the Copic markers I used.

Hair
B32
B21
B24

Face
E00
E02

Cloths
BG10
BG13
BV00
BV04
V01
V04
V09

Thank you for stopping by!

Friday, July 31, 2009

Friday Cards

I feel like I was just so super busy this week. I am glad to get these cards done and up today. As always, thank you for stopping by to take a look.


This card is created with brown and lime green cardstock, I purchased both at Archivers and they are the Archivers brand.

I used the Handful of Henna stamp set from Technique Tuesday. I stamped each piece with Basic Brown ink from Stampin' Up and embossed with clear embossing powder. I then went back and shadow stamped each design with Sahara Sand ink to give a little more depth. I went back in and accented the design with a white, lime green and blue gel pens. It is key to let the gel pens dry before moving on to the next step. I then aged the lime green cardstock with the Basic Brown ink.

Next, I cut the bands in brown and lime green and edged the lime green piece with the EK Success punch Moroccan Lace. I aged the lime green with the Basic Brown ink. I tied around the strips with Organza Ribbon in Brown from Stampin' Up. My final accent for this card was the little gems, they are from Hero Arts.


Surprise! More Damask!

To begin, I started with a piece of white cardstock, I sponged on Broken China and Faded Jeans Distress Ink from Ranger. Once the ink dried, I stamped using the Antique Damask stamp from Memory Box with Versmark and then I embossed using Gold Zing! Embossing Powder. This embossing powder is great, very opaque and easy to use.

The background and bellyband papers are Brushed Gold cardstock from Stampin' Up. The off-white band was painted using Antique Linen Distress Crackle Paint from Ranger. Once it was dry I sponged over the painted strip with Tattered Rose and Tea Dye Distress Ink. The small medallion was created by cutting out two circles. The blue one was sponged with Broken China and Faded Jeans Distress Inks. I then edged it with a gold paint pen. The gold piece was created by repeatedly embossing the small circle with Gold Zing! powder. On my third embossing pass pressed a stamp from Papertrey's Guidelines Two set in the hot embossing powder. My three brads are custom colored by dipping each brad into the Gold Zing! powder and heating. My last step was stamping the sentiment from Stampin' Up in Faded Jeans.


I am really loving the Alcohol Inks from Ranger, you can create a lot of different looks. I started with a base of glossy white cardstock from Stampin' Up. I sponged on alcohol ink in Eggplant and Meadow, once I had a base layer on I added the Blending Solution and Pearl Mixative on my felt and sponged again. Once dry, I stamped the Compass Rose image, it is from Tattered Angels and is called Tattered Traveler Compass. I used Black Archival Ink from Ranger. I dryed it with my heat gun to set the ink. Next, I poured a little of each color of the alcohol ink onto my craft mat. I only put a little ink on my sheet at a time, as it dries very fast. I then painted with the ink using the Eggplant and Meadow and Silver Mixative.

I had cut a little of the initial cardstock off and used that as my bellyband. I stamped on the bellyband using an image from Technique Tuesday from the Bijou Borders set using Black Archival Ink. I then cut my small square and performed the same inking technique as I mentioned above. Once dry I stamped the central image from the American Crafts set Majestic. I then embossed with clear embossing powder. I added the silver brads and mounted to black cardstock. Once assembled I mounted the base to Eggplant Envy cardstock and then to Sage Shadow cardstock.

Sunday, July 26, 2009

Alcohol Ink Cards

Hello! I am finally back. We photographed a three day horse show last weekend and that really ate into my card making time. Between recovering from the horse show and editing and posting the photos I didn't have much time to craft!
I have really been loving the Thinking Inking classes over on Two Peas in a Bucket. Jennifer McGuire has done an amazing job. I also went back over to Tim Holtz's site to re-watch some of his product demos. Here are some of the cards I made using the Ranger Alcohol inks.


For the primary image I began with a square of white glossy cardstock. I used my applicator tool and loaded my felt with Cranberry and Butterscotch and Blending Solution. I covered the whole square and once that was dry I added Copper Mixative to my felt and pounced over the existing colors.

I loaded my stamp, Tapestry Pattern from Stampabilities, with Versamark Ink and stamped on the square. I quickly poured Ranger Distressed Embossing Powder in Black Soot over the image and heat set. Once cool I rubbed off the release crystals. I think that I would have gotten a better result if I had remembered to shake the embossing powder before I used it. Since I don't have a copper paint marker to do the edges, I used my Versamark pen and Copper Embossing Powder. I simply ran the Versamark pen down the edge and the sprinkled that with Copper Zing! Embossing Powder, then heat set it.

I then repeated the Alcohol Ink technique on the background piece and the bellyband piece. I added a Black Organza ribbon from Stampin' Up and then added three brads. As usual, I custom colored my brads with Copper Zing! Powder.


This purple card was made using Wild Plum, Stream and Eggplant Alcohol Ink and Pearl Mixative. For this one I started with the Wild Plum on the left-hand side and then started with the Stream and Eggplant on the right-hand side. I then added the Blending Solution and the Pearl Mixative to my little felt piece and and pounced over the whole card. This is what blended the two sides of the card.

The stamp on this card is from a new set I picked up this week called Formal Esque by Recollections. This set is very elegant and I see myself using it a lot. For this card I used the main image and loaded it with Archival Ink in Jet Black. I would have normally gone with Stazon but I thought that I would try this ink. I was really happy with how it worked on the glossy cardstock. Since it takes awhile for the ink to dry I hit the piece with my heat gun. If I don't do that I run the risk of smudging it and ruining all of my hard work. My last step was adding the little dots with Liquid Pearls in White Opal. I also added just a few little dots of Stickles in Frosted Lace. Added a black piece of cardstock and a black organza ribbon from Stampin' Up.


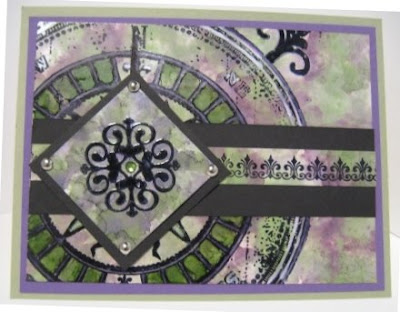
For the background of this card I started with glossy white cardstock, again. I loaded up my felt piece with Meadow, Currant, and Slate Alcohol Inks and added a little Pearl Mixative and then Blending Solution. I kept the application a little lighter on this card just for a different look. I normally go for intense colors so I sometimes make myself back off a little. I then stamped the background images with a great new stamp from American Crafts. It is from their Majestic Set. I used the Archival Ink in Jet Black and then embossed it with Black Embossing Powder from Stampin' Up. I actually stamped the whole background and then decided to emboss the images. I guess that is a benefit of working on glossy cardstock.

For the central image I selected another image from the Majestic Set and stamped with Archival Ink in Jet Black and embossed with Silver Embossing Powder from Stampin' Up. I mounted the black piece of cardstock to a piece of silver cardstock, both from Stampin' Up. I selected a smooth gem from Hero Arts and colored it with the Currant Alcohol Ink. I adhered the image to the background with pop dots and added a black organza ribbon from Stampin' Up.

Thanks for stopping by there will be more soon!!